
Do you know how to connect an iPad to a projector? One of the questions many iPad users have is if they can connect their iPad to a projector via a USB connection.
The answer is yes, and it is actually quite simple. This article will discuss how to connect an iPad to a projector via USB.
By the end of this article, you should have a better understanding of the process and feel confident in your abilities.
Table of Contents
Recognizing The Ports
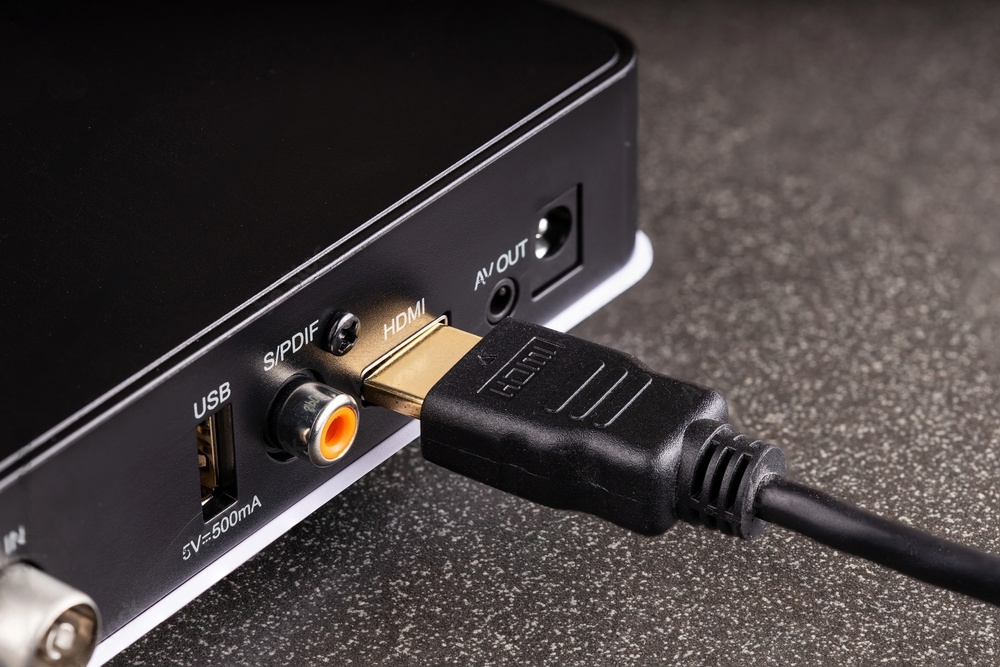
It’s crucial to know which ports are accessible on both devices if you want to connect your iPad to a projector effectively. Typically, projectors contain connectors like DVI, VGA, DisplayPort, and HDMI.
On the other hand, iPads have either a USB-C port (newer versions) or a Lightning port (previous devices). You can identify the adapter required for the connection by identifying the ports on each device.
Selecting the Correct Adapter
You will want an adapter that works with the ports on both the iPad and the projector to connect the two devices. The following is a list of some frequently used adapter choices:
- If your iPad has a Lightning port and your projector has an HDMI port, you should use this converter to connect the two devices.
- Use this adapter to connect an iPad with a Lightning connector to a projector with a VGA port if your iPad has one.
- If your iPad has a USB-C connector and your projector has an HDMI port, you will need a USB-C to HDMI adaptor.
- If you have one, use this adapter to connect an iPad with a USB-C connection to a projector with a VGA port.
How to Connect an iPad to a Projector: 7 Easy Steps
You must confirm that a projector, TV, or monitor can take an HDMI or VGA input before you attempt to display anything from an iPad on it.
Since the iPad has a Lightning port, you can attach an adaptor and use an HDMI or VGA cable to connect it to the display device. HDMI is preferable for transmitting video and audio because it only requires one connection.
If you frequently give presentations, keeping both adapters and cables on hand can be a good idea because some older systems can only support VGA.
Step 1: Use the proper adapter
Before attempting to display anything from an iPad on a projector, TV, or monitor. Make sure that the device can accept an HDMI or VGA input.
Since the iPad has a Lightning connector, you can attach an adaptor and connect it to the display device via an HDMI or VGA cable.
Since HDMI only needs one connection, it is frequently preferred for video and audio delivery. Because some older systems can only support VGA, it can be a good idea to keep both adapters and cables on hand if you frequently give presentations.
Step 2: Select the Correct Cable
It is advised you utilize the HDMI or VGA cable that came with your monitor, TV, or projector for the best results.
You can purchase an HDMI or VGA cable from a third-party vendor like Monoprice or a Belkin HDMI cable from the Apple Store if you require one.
3: Connect the devices
It is now time to connect your iPad to the projector after getting the proper adaptor and cable.
Simply put the HDMI or VGA cable into the adapter’s opposite side after connecting the USB-C end to the port on your device when using USB-C.
If your iPad has a Lightning connector, connect the adapter’s Lightning end to it before inserting the HDMI or VGA cable into the other port.
Step 4: Turn on your electronics
Check that the HDMI or VGA input is turned on and that both your iPad and projector are powered on.
Open a file on the iPad that is a movie, presentation, photo, or other type of media, and then choose the AirPlay option from within your app.
Step 5: Choose The Projector’s Input Source
You should now be able to view the display from your iPad on the large screen after choosing the appropriate input source on the projector.
Step 6: Modify the display settings
You can also change the projector’s display options if necessary to make sure that the information on your iPad is shown correctly.
Step 7: Begin your project
The projector’s screen should be enlarged or mirror your iPad’s screen once you’ve established a connection and made the necessary adjustments. After that, you can see the desired content, use apps, or play videos.
How to Connect an iPad to a Projector Wirelessly?
The detailed instructions for wirelessly connecting an iPad to a projector are provided below:
- “iProjection” can be downloaded from the App Store.
- Start your projector now, and choose wireless LAN as your connection type.
- You must scan the QR code on the projector’s screen to utilize the iProjection app. English will be the language of the app.
- Your screen will show the message “Register WiFi Profile.” Click OK to proceed.
- On the following screen, select Install.
- Click “Install,” enter your iPad password, and select “Done.”
- You must select “Open this page in iProjection?” on the following screen.
- When you click “Open,” your projection will start to play.
- Thanks to the WiFi connection, you can now wirelessly project what is on your iPad’s screen onto the projector.
If you take the proper precautions, connecting your iPad to a projector can be easy. Determine the ports on both devices first, then pick the proper adapter and cord.
You should be prepared to project content from your iPad onto the projector screen once you’ve connected the devices and turned them on.
How to Connect iPad To a Projector Using Adapter Cable?
Since the projector most likely has a VGA or HDMI port, you will need an adaptor to connect your iPad. VGA only supports video, but HDMI supports both video and audio.
Obtaining adapters with either a VGA or HDMI input is handy. But keep in mind that you’ll need a VGA or HDMI cable to connect the converter to the projector.
Check the kind of port your iPad has to make sure you have the right adaptor. You’ll need a lightning adaptor because iPads normally have lightning ports.
A USB-C adaptor is required for the more recent iPad Pro devices, which use USB-C connectors.
How To Connect iPad to Projector Via Bluetooth?

The process of using Bluetooth to connect an iPad to a projector is not difficult. Check to see if the projector is Bluetooth-capable and in search mode first.
Go to the Settings app on the iPad and choose Bluetooth. The iPad should recognize the projector after Bluetooth is turned on.
After choosing the projector, the connection will be made. If the projector requires a PIN number, enter it on the iPad, and the connection should be made.
The iPad can be used to display its content on the projector once the connection has been made.
Tips for Troubleshooting: How to Fix Common Problems
Don’t worry if you have issues connecting your iPad to a projector. Although it is a widespread problem, there are some remedies. View these troubleshooting recommendations:
- Signal Issue:
If the projector is not showing any signal, check to make sure that all of the connections are tight.
Make sure the HDMI cable is connected correctly or that the wifi connection is active. If required, restart your iPad and the projector.
- Audio Problem:
Check the projector’s and your iPad’s audio settings if you’re encountering audio problems. Make sure that it is not muted or at a low setting.
Verify that the audio is being carried through the HDMI cable if you’re utilizing a wired connection.
- Not compatible display or distorted image:
Verify the resolution settings on your iPad and the projector if the projected image is deformed or doesn’t suit the screen properly.
For the best possible viewing, adjust the resolution to the projector’s native setting.
- Unstable Wireless Connection:
Make sure your iPad and the mirrored device or Apple TV are close to each other if you’re using a wireless connection and encountering a weak or unstable signal.
Attempt to reduce wireless signal interference from other electronic devices and potential obstructions.
Other Ways to Connect an iPad to a Projector
Using Apple TV, you can project the screen from your iPad to a projector without the need for cords or adapters.
Although there are wireless HDMI adapters that do away with cords, it’s crucial to remember that these wireless solutions could have restrictions and require additional setup steps.
Frequently Asked Questions
Q. Can you connect iPad to projector wirelessly?
On your iOS device, click [Settings] and then [Wi-Fi]. Turn on [Wi-Fi]. These networks are displayed. Choose the SSID of the projector you wish to connect to.
Q. Why is my iPad not working with my projector?
You should confirm that the iPad Air and HDMI wire are both firmly connected to the Lightning to HDMI adapter. Occasionally, issues can arise from a faulty connection. When connecting the adapter to the projector, try with a different HDMI cable.
Q. How do I connect my iPhone to a projector without AirPlay?
Connect your Digital AV or VGA adapter to the iOS device’s bottom charging port. Connect your adapter to an HDMI or VGA cable. Your secondary display (TV, monitor, or projector) should be connected to the other end of your HDMI or VGA cable. Switch on your secondary monitor.
Q. How can I connect my phone to a projector without HDMI?
It is simple to connect your phone to a projector without HDMI. For seamless connectivity, use Wi-Fi, Chromecast, or Miracast screen mirroring. Casting content from your phone to the large screen is simple and makes presentations and entertainment convenient and interesting.
Q. Why can’t I find AirPlay on my iPad?
Double-clicking the Home button on an iOS device will show you the apps you’ve recently used. Double-tap the recently used apps from left to right until you see the AirPlay icon. Your iOS device and Apple TV might not be connected to the same network if you don’t see the AirPlay icon on your iOS device.
Conclusion
Connect an iPad to a projector lets you share, present, and consume multimedia content on a bigger screen. If you follow the instructions and troubleshooting advice in this tutorial, your setup will go without a hitch whether you choose a wired or wireless connection. Utilize the adaptability and simplicity of displaying your iPad’s screen on a large screen to capture your audience with eye-catching graphics and interesting material.